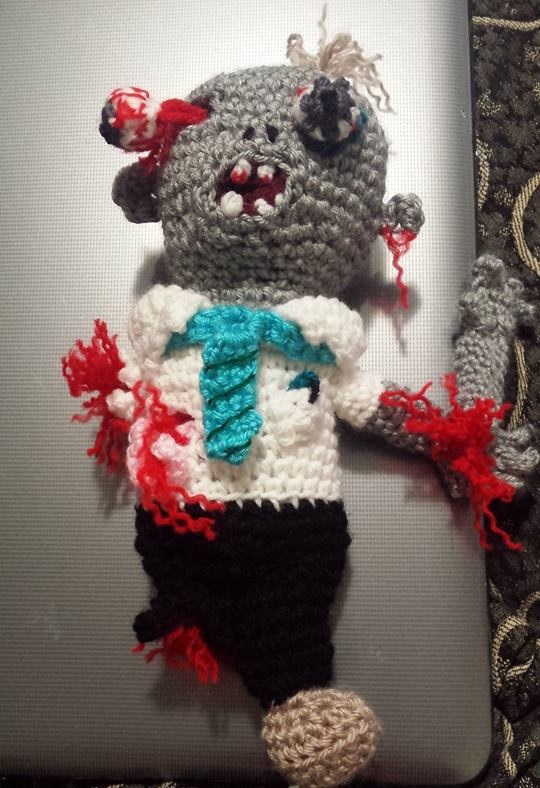
(4.0 hook)
Head: worked in rounds, do not join
Round 1: chain 2. 8 sc in second ch from hook (8)
Round 2: 2 sc in ea st around (16)
Round 3: 1 sc in next st, 2 sc in next st, around (24)
Round 4: 1 sc in next 2 sts, 2 sc in next st, around (32)
Rounds 5-6: 1 sc in ea st around (32)
Round 7: (to create eye socket) chain 4, skip 2 sts, sc in next st. continue sc around
Round 8-10 1 sc around (34)
Round 11: (to create a mouth) 1 sc until your mouth hole is located properly relative to the eye socket. chain 6, skip 4 st, sc in next st. sc until end of row. (36)
Round 12: 1 sc in next 2 st, decrease 2 together, around (27)
Round 13: 1 sc, dec 2 tog, around (18)
Round 14-15 1 sc around. Fasten off.
Next you will bring your zombie head to life!

In order to have an eye socket and mouth hole without the stuffing falling out, this is what I did:
Eye socket, in black (make 1)
Round 1: ch 2, 8 sc in 2nd ch from hk
Rounds 2-4: sc around (8)
Fasten off, leaving long tail to sew. Sew on the inside of the zombies head where you made the eye socket hole.
Mouth in dark burgundy
chain 4
Round 1: sc in next 2 st, 3 sc in the end. Working on the opposite chains: 1 sc in next 2 and 3 in the end (10)
Round 2: 2 sc, sc in each st to end, 2 sc in end stitches, sc back to beginning.
Round 3-4 sc around
Fasten off and sew this on the inside of the zombie around the mouth hole.
The teeth are just knots. I took my white yarn, attached it inside the zombie head. From the inside of the zombie head I pulled it the yarn out threw the mouth, made a knot, and went back inside the mouth. For a bigger tooth, I made 2 knots. I used skinny red yarn to embroider blood on 2 of the teeth.
Eyes: with dark grey, ch 2. 6 sc into 2nd ch from hook. Fasten off. Attach white and sc around for 2 rows. sc 2 together for 1 row. Embroider black pupils into the middle.
Stuff eyes but do not over stuff. Use embroidery thread to give the eyes a blood shot look (I split my red yarn so I had thinner red to embroider with). Eye Popping out: Attach 3 pieces of red yarn to one eye and sew through the eye socket attaching on the inside of the zombie man, so it looks like the eye is hanging by veins. Attach 2 more pieces of red yarn and split them with fingers to stimulate blood spurting. Stationary eye: sew to face. Use dark blue to chain 4. Fasten off and sew under stationary eye.
Nostrils: embroidered in black
Ear: row 1: Chain 2. 6 sc in second chain from hook.
row 2: chain 1, turn. sc across (6) Sew your ear to the side of the head.
Ear half: Repeat row 1. sew on sideways with red yarn attached to stimulate blood.
Hair: Attach brown yarn to the top of the head with knots, then frizz it up by splitting up the yarn.
The head is now complete! Stuff.
Shirt:
Round 1: Attach white: sc in each st around (18)
Round 2: 1 sc in next st 2 sc in next st, around (27)
Round 3-5: 1 sc around
Round 6: Create a hole for the zombies guts to fall out of. chain 5, skipping 4 stitches and sc in the next st (28)
Rounds 7-9: sc around. fasten off.
Pocket: chain 4. 1 sc in 2nd chain from hook. 1 sc in next 2 st. chain 1, turn
rows-2 and 3: sc in each st (3), chain 1 and turn
sl st at end of row 3. leave long tail and fasten off. sew to shirt.
Pen in pocket:
in dark blue chain 3, 1 sc in 2nd ch from hook. fasten off. Sew to shirt using black thread to (stimulate pen lid)
Stomach hole:
repeat process for mouth, but in red.
Guts:
with pink chain 20, turn. sc to end. Sew inside hole. Use red thread for blood, by sewing inside stomach hole.
Shirt sleeve with arm:
round 1 chain 2, 8 sc in second chain from hk.
rounds 2-4: sc around. fasten off
Attach grey. Arm
round 5-6 sc around
round 7: dec 2 tog around. do not fasten off, continue to palm
palm: round 1 chain 2, 6 sc in second chain from hook
round 2: 2 sc in each st
fold palm circle in half.
Fingers: Working through both halves, sc in first st. chain 3, 2 sc down the ch, sl st into same st.. sc into next st, ch 4, sc down ch.
repeat to make 4 fingers. thumb: sl st to side of palm. sc, ch 2, sc down. sl st and fasten off
Sew finished arm and sleeve into the shirt.
Shirt sleeve without arm:
Repeat round 1.
chain 3. sc down the chain and back to round 1. sl st in next chain. Repeat around (Stimulate torn shirt sleeve). Add red thread for blood spurting. Sew onto shirt.
Detached arm:
Repeat instructions for arm, but start the first round with red. detach, and add grey.
Do one extra round of sc in grey (so that the decrease round 7, will be round 9 on this arm). Complete palm and fingers as above. Attach red thread to red bottom of this arm. Sew to attached hand to stimulate this zombie is carrying his detached arm.

Love this, good job x
LikeLike
Thx! 🙂
LikeLike